Pitch
“I have spent hours but all I get is “invalid_client” error, I don’t even know what am I doing wrong!”
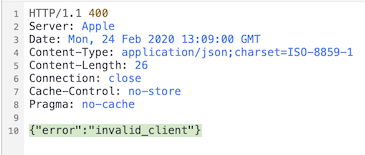
You have followed a tutorial on how to implement Sign in with Apple step by step, but you are stuck at the dreaded “invalid_client” error every time you try to validate the authorization code with /auth/token.
You checked your client_id, client_secret and even the redirect_uri parameters, all of them seem correct, then you try to swap client_id with the app bundle ID, web services ID, changing the headers used to generate the client secret JWT… hours has passed and despite all the trial and error, you are still getting the same “invalid_client” error! 🤬
The error message “invalid_client” isn’t particularly helpful as it doesn’t say which part of your code is wrong, could it be your client_id? client_secret? or could it be the authorization code that you’ve gotten from the app isn’t formatted properly? You wished Apple would provide a more helpful error message on solving the issue.
Apple require us to implement Sign in with Apple before April 2020, yet the documentation is severely lacking, the obscure error message certainly doesn’t help. You start to worry what if you couldn’t implement Sign in with Apple before the deadline, and Apple rejected your app upcoming update, causing the delay of some fixes/updates to your app, which makes your users and your boss unhappy 😣.
“I have scoured all the documentation at length and have still not gotten anywhere.”
After spending countless hours battling the token validating issue, you have finally managed to retrieve the token! yay! But now you are stuck again, as there isn’t even a word in Apple documentation on how to handle subsequent REST API call after user has signed in successfully! As the token returned from validating authorization code is just valid for 10 minutes, and Apple only allow refreshing token once a day (more than that will result in throttling), how should we handle subsequent REST API call to the backend using token?
There’s an endpoint to get Apple public key, but how do I even use this hash to verify signature?! This certainly doesn’t look like a public key file format (eg: —–BEGIN PUBLIC KEY—– xxxxxx —–END PUBLIC KEY—– )
{
  "keys": [
    {
      "kty": "RSA",
      "kid": "AIDOPK1",
      "use": "sig",
      "alg": "RS256",
      "n": "lxrwmuYSAsTfn-lUu4goZSXBD9ackM9OJuwUVQHmbZo6GW4Fu_auUdN5zI7Y1dEDfgt7m7QXWbHuMD01HLnD4eRtY-RNwCWdjNfEaY_esUPY3OVMrNDI15Ns13xspWS3q-13kdGv9jHI28P87RvMpjz_JCpQ5IM44oSyRnYtVJO-320SB8E2Bw92pmrenbp67KRUzTEVfGU4-obP5RZ09OxvCr1io4KJvEOjDJuuoClF66AT72WymtoMdwzUmhINjR0XSqK6H0MdWsjw7ysyd_JhmqX5CAaT9Pgi0J8lU_pcl215oANqjy7Ob-VMhug9eGyxAWVfu_1u6QJKePlE-w",
      "e": "AQAB"
    }
  ]
}
Enough complain about Apple, let’s pause a moment and imagine..
What if you could implement Sign in with Apple with ease, submit update to App Store confidently and get more signups?
Wouldn’t it be nice if there’s a straightforward, step-by-step guide which you can follow to implement Sign in with Apple? From generating public key, validate authorization code, parsing identityToken to handling sign out?
You could implement Sign in with Apple within a day, and continue working on features or bug fixes that matters, which make your users happier (and also your boss).
Learn the workings of JWT (JSON Web Token) and JWK (JSON Web Key)
Most of the frustration arise when implementing Sign in with Apple is because we haven’t deal with JSON Web Token before, and generating a JSON Web Token (JWT) for the client_secret can be a confusing step especially Apple is using a quirky algorithm named “RS256” elliptic curve.
IdentityToken retrieved from Apple’s API is also in JWT format, which contains an unique identifier for the user in the sub key :
{
  iss: "https://appleid.apple.com",
  aud: "es.fluffy.AppleLogin",
  exp: 1578850937,
  iat: 1578850337,
  sub: "001802.ba20d2adb5954ff0ace4972268a21303.1014",
  c_hash: "JXNEyqNeiUwJ5_tNjYZkLg",
  email: "uikyccaycc@privaterelay.appleid.com",
  email_verified: "true",
  is_private_email: "true",
  auth_time: 1578850337
}
“001802.ba20d2adb5954ff0ace4972268a21303.1014” is the unique user ID (which correspond to an Apple ID) for your app.
Follow a step by step guide with code sample on each step to implement Sign in with Apple, with practical SIWA guide book
Sign in with Apple flow is comprised of several steps:
Prerequisite steps
- Backend Generate a RSA public key file from Apple public key API /auth/keys and store it in the backend
- Download AuthKey (private key) generated from Apple developer portal for Sign In With Apple
- Backend generate use the AuthKey to generate a JWT which will be used as “client_secret” parameter during token validation
SIWA steps for mobile app
- Getting authorization code (as string) from iOS app ASAuthorizationController, and send this to the backend
- The backend server send this authorization code to Apple’s server endpoint /auth/token, upon success validation, will return access_token, refresh_token and id token
- Decode the id token JWT to extract user data such as the unique identifier, email and name (if user opt in to reveal these data)
- Use the unique identifier / email / name info to create a user, or if an user already exist, attach the unique identifier to it
- Optionally, generate your own set of access_token / refresh_token on the backend and send it back to mobile app client, as Apple throttle token refresh to once per day per user, and the access token retrieved earlier is only valid for a short period of time.
- The mobile client use the backend generated access_token for subsequent API calls to backend
- User sign out or revoke SIWA permission from the Settings app, your app detect this and log user out
SIWA steps for website
- Redirect user to Apple OAuth page, user login with their Apple ID there
- Apple will then send back a POST request with the user data to your server (redirect_uri)
The practical SIWA guide book will explain each of these steps with accompanying code sample (iOS in Swift, backend in Ruby/Sinatra). The client_secret JWT generation part will have sample code using PHP, Python, Ruby and Java.
The book is still in progress, sign up to get notified when it is finished and get early bird discounts!
convertkit form here.
